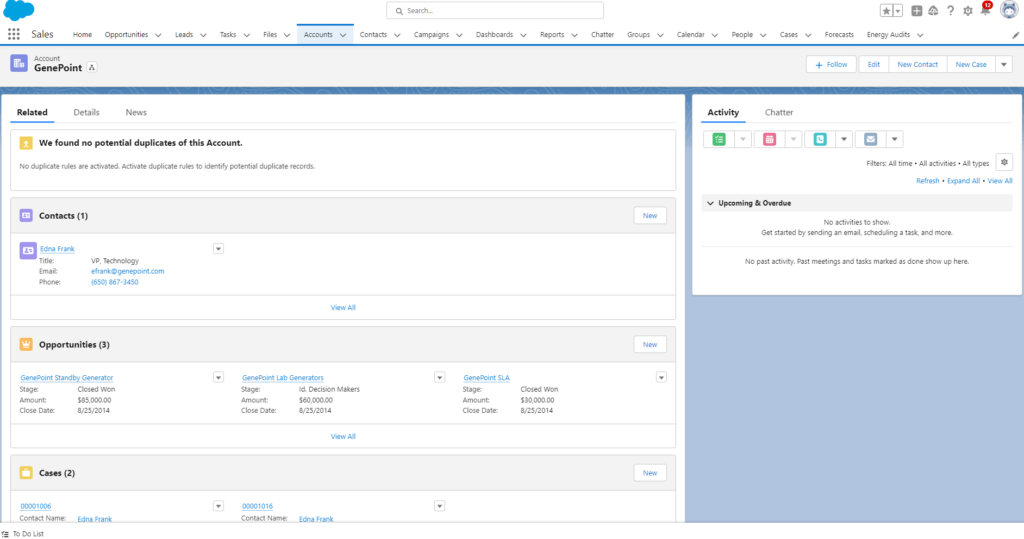
Having easy access to relevant data is one of the main pillars of Salesforce’s functionality as a platform. It gives you the tools you need to see the full picture at all times plus the customization options to make this possible with a simple click, not code solutions. One of the main ways Salesforce keeps relevant data close at hand is through Salesforce related lists on record pages. Being able to see related data on the same page and to customize what you see helps to keep things moving in your organization.
What is a Salesforce Related List?
Simply put, a related list is a collection of data sorted by an object that is found on a record page in Salesforce. All records listed on a related list have some sort of relationship to the record it is displayed on, whether that is Lookup, Parent-Child, or Master-Detail. Some related lists are standard, such as Opportunities and Contacts on Account records, because they are related out of the box in Salesforce. Related lists can be sorted in differing orders to keep more relevant information near the top of the page and in Lightning Experience, an individual related list can have its own window on a record page, related lists can have their own tab, or they can be sorted into a quick links section. All of that will be explained later in this post. Related lists can have up to 10 columns visible and those columns can be sorted to customize the order in which data is displayed.

How to edit Related Lists
To edit a Salesforce Related List, select an Object in Object Manager for whose page layouts you want to edit. Once on that object’s detail page, select “Page Layouts” from the left side menu. Select the correct page layout to edit if there is more than one option to enter the page layout editor. Scroll to the related lists below all the fields on the record layout or select “Related Lists” from the left side menu of the bucket at the top of the page.
Once you have landed on the list you wish to edit, click the wrench icon associated with the desired list to open up the popup window. Two sections will appear in this window: Columns and Buttons, with Columns being the default opened section. Columns display two windows: Available Fields and Selected Fields. Select which field you would like to add or remove and use the “Add” or “Remove” buttons to move the field between the two windows. If you want to reorder the selected fields, use the “Up” or “Down” buttons to set the preferred order of fields in the related list. This is where you can select those 10 fields to appear in the related list. Salesforce will restrict you once you have added too many fields to the Selected Fields window. You can also select which field the list should be sorted by. Related lists are sorted by the name or number field of the object by default. If the object has multiple page layouts, you can also select which other layouts you wish to have these changes associated with.
In the Buttons section, you can choose which standard buttons appear in the header area of the related list. This can help with the quick creation of new records or new actions that are associated with the related list’s object. Once all changes have been completed, click the “Ok” button at the bottom of the popup screen, then save the page layout.

Related List Location on the Page Layout
In Lightning Experience, the location of related lists has been freed from restriction with the introduction of Lightning Record Pages. Using Lightning App Builder, related lists can now be placed anywhere on the record page, as referenced above. To make these changes, search for “Lightning App Builder” in the Quick Find box or select “Lightning Record Pages” from the left side menu of a selected object. This will take you to the list view of created Lightning record pages and where there is an option to create a new one.
Once on the App Builder canvas, there are multiple component options for where related lists can be used.
- TABS: A tabs component allows for different things to be lumped together on different tabs on the record, such as record details, Chatter or all Activity information, or communication with external objects or apps. Related Lists are routinely added to this type of component to allow for easy switching between record details and related data.
- RELATED LISTS: This is the most similar to the standard page layout, lumping all the related lists together in one component one after the other.
- RELATED LIST – SINGLE: This isolates one related object’s records in a component that can be placed anywhere on the record page. This is often used on layouts that have two or more regions for components to be added.
- RELATED LIST QUICK LINKS: This option collects all the objects in one place with a hyperlink to a list view of all the related records on that object. Users can hover over the object name and see a list of the related records, and the total number of related records is off to the right of the object name. This is usually added at the top of a record page, above the record details.
- DYNAMIC RELATED LIST – SINGLE: This option is only available for desktop users and builds on the Related List – Single option. A dynamic-related list can have filters and be more specifically altered for sort order and fields visible. This is available for custom objects and core standard objects such as Accounts, Contacts, Leads, Opportunities, etc.
And that is a breakdown of the Salesforce related list. Knowing the options and expectations of one of the easiest ways to keep up with related data can help your org maintain the right data in front of the right people at all times. Again, Salesforce is meant to help with ease of access, and the related list definitely does the job.
If you require assistance with your Salesforce instance, StarrData is here to help. We are one of the top-rated Salesforce consultants, contact us and we can help!

